In this document we will explain how to integrate our auction theme with woocommerce in wordpress. Although the wordpress auction theme doesn’t really need integration with woocommerce, because it comes with everything out of the box, and works without any external plugin, we can do custom integration with woocommerce if you wish so. In order to do that we can only do wiht the auction pro custom package, and its a work on client by client basis. You can read more information about the different packages for the auction theme, here.

Integrating with woocommerce might bring benefits from the standpoint of shipping options (although the theme comes with a shipping module itself) and the different payment gateways which should work with it. Contact us here if you need more information.

This entry was posted in and tagged , . Bookmark the permalink.

The auction theme comes with a widget that displays all categories, and lets you add an image for each category to display as thumbnails in the homepage, or any other page using a page builder (elementor or other).

1. Go to auction theme menu

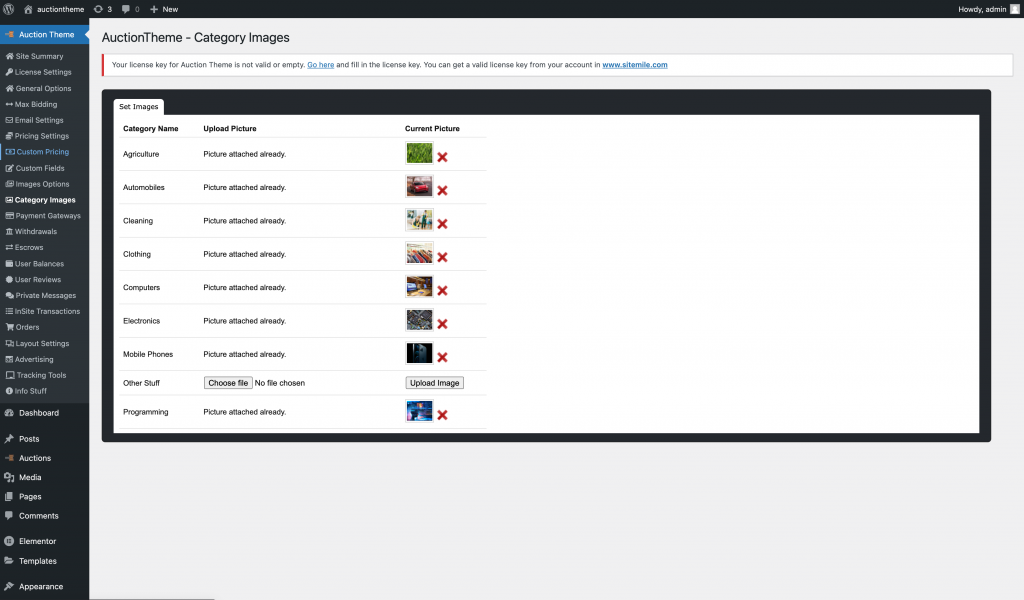
After adding all the desired categories, go to Auction Theme menu, and then the Category Images sub menu. Add the image for each of your desired category.

2. Go to page builder

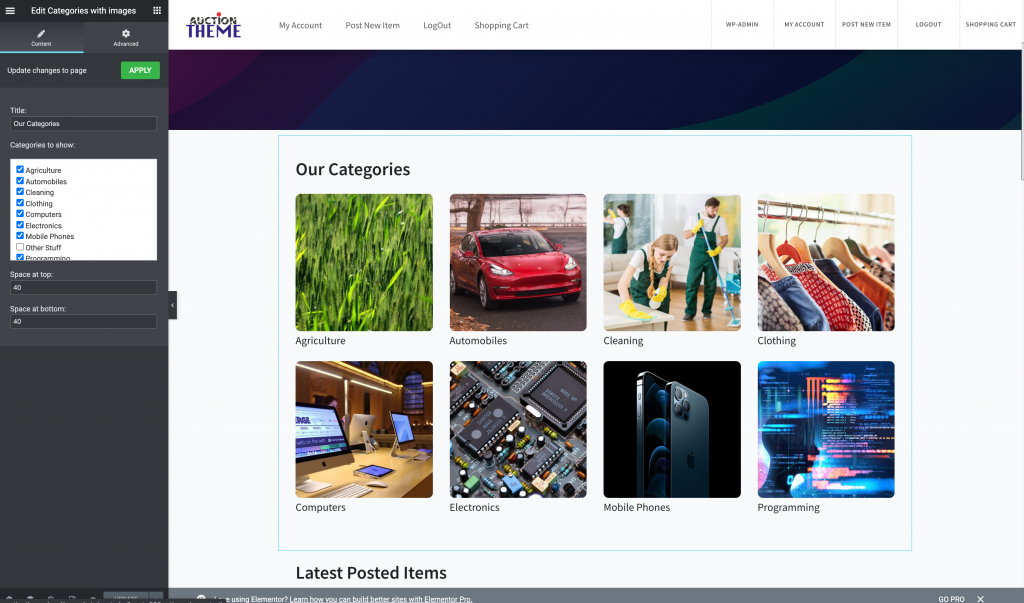
Add your widget, or edit a current widget, and select your desired categories.

This entry was posted in and tagged , , . Bookmark the permalink.

This article will show you how to edit and also how to build from scratch the homepage of the wordpress auction theme.

1. Demo data already imported

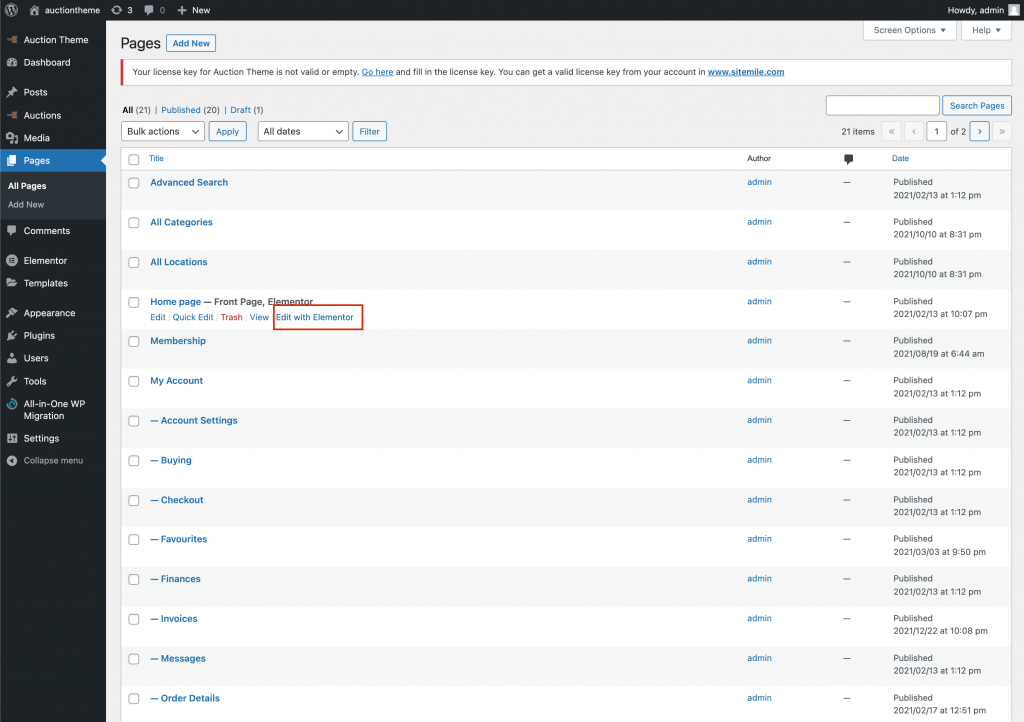
After importing the demo data using the process described in your account area, you will have everything already created, including the homepage. To edit it, you have to go to admin area -> Pages section -> search for the homepage, and click edit with elementor. There are two important things here:

By default the theme with the demo data comes with elementor free version. You can use any other page builder that you want, like divi builder, or visual composer. And if you stick with elementor, then you have to know that you dont need to use elementor pro version, unless you really want to. The theme works fine with elementor free version, because the theme comes with many widgets that show you: categories, images, latest posted auctions/items.

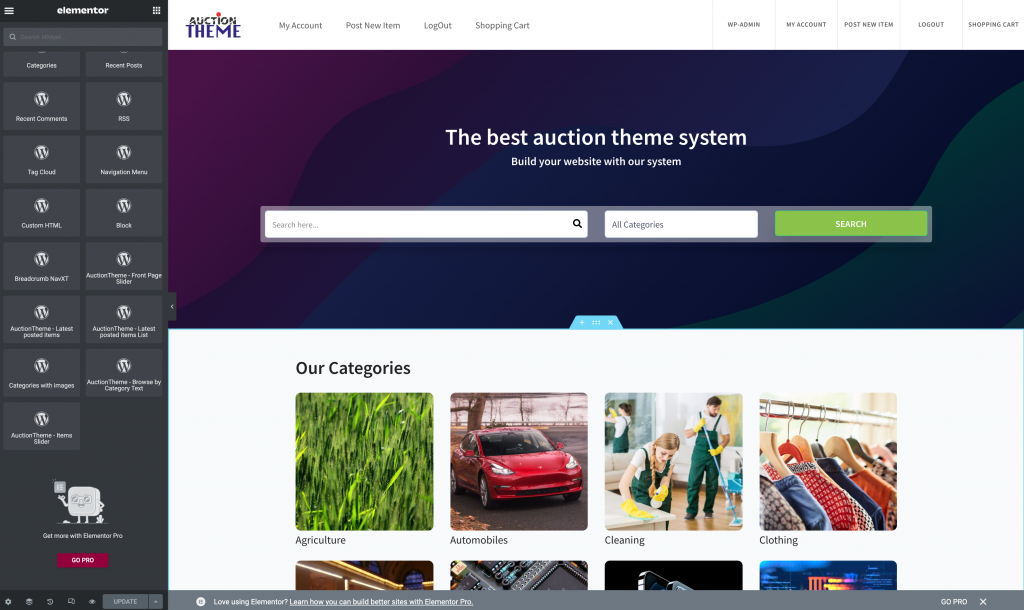
Editing the homepage by elementor brings you to a screen like this, where you can add new widgets, or edit current widgets. Edit the text, categories list and others.

2. I do not want, or have not imported demo data

If you do not want or have not imported the demo data, you must start from scratch. First thing is to go to admin -> Pages -> Add new
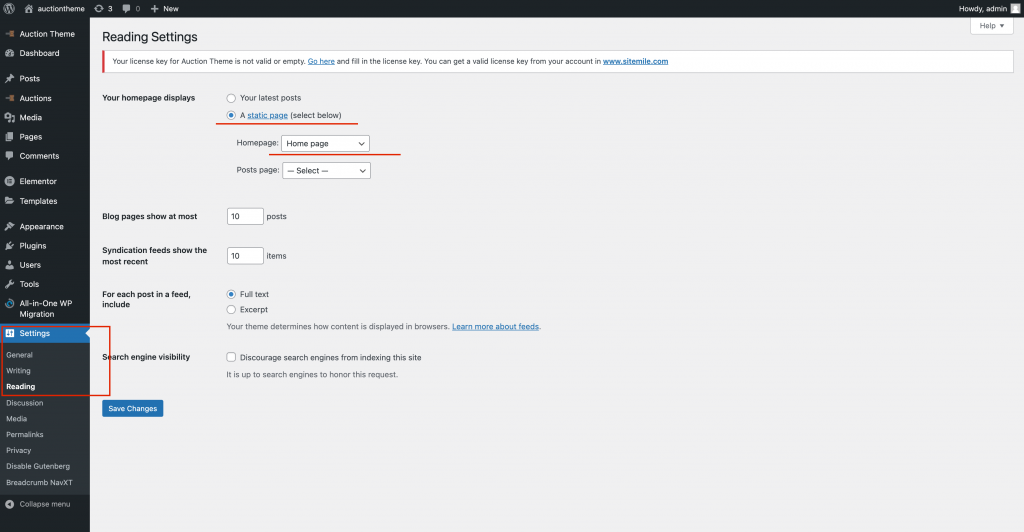
Name that as “Homepage” then go to the admin main menu -> Settings -> Reading, and select the homepage from the dropdown
After that, go back to Pages section, and edit the Home page by elementor, add the widgets that you wish.

This entry was posted in and tagged , , , , . Bookmark the permalink.

This article will show you very briefly, how to add new, edit or remove categories to and from the wordpress auction theme.

1. Go to admin side

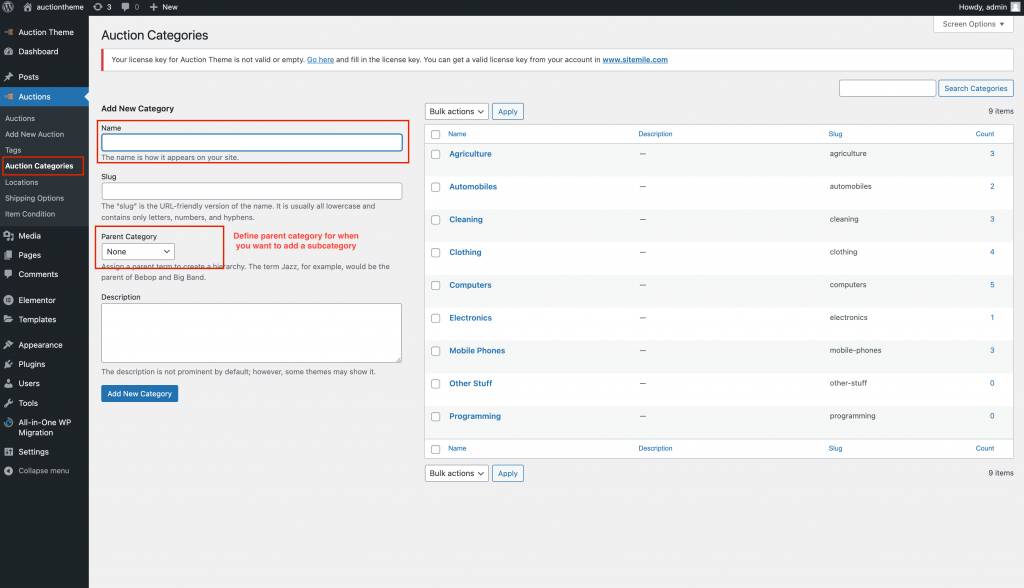
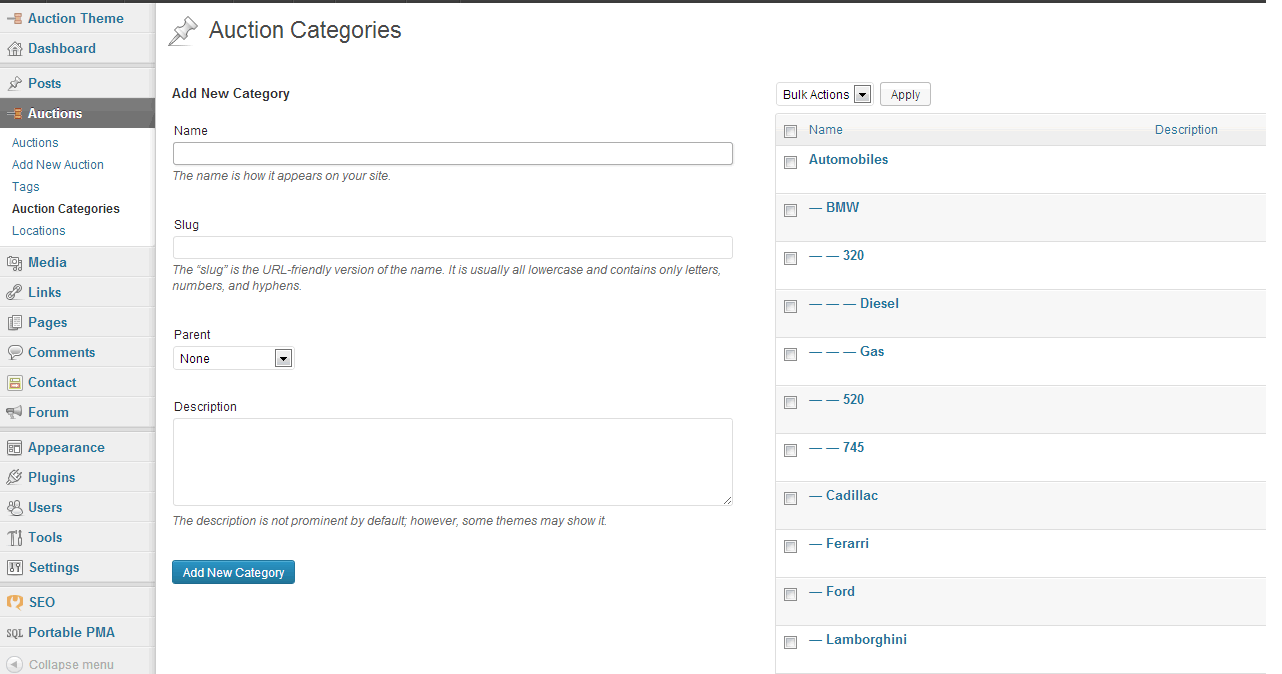
Assuming you are logged in as the admin of the website, first step is to go to the admin side, and go to the Auctions menu. Then go to Categories submenu. From there you will see a list of existing categories, which you can edit or remove (use the proper buttons underneath each item, you might need to hover your mouse there). Adding a category is also simple, just type your category name in the name box, and click enter. You also can add a subcategory of another main category (car make -> car model) if you select the parent category from the dropdown.

2. Go to widgets/page editor

Now you will be able to use these categories, either in the menus section, or when editing the homepage contents, to add widgets with the newly added categories. See the other articles to show you how to add widgets, and edit the categories list.

This entry was posted in and tagged , , . Bookmark the permalink.

Bookmark the permalink.

In this article, we will present a very short way on how to setup stripe payment gateway, and also setup a webhook for your new microjobs website. The stripe gateway comes with the pro version of our pricerr microjobs theme. See below a series of clarifications and how to setup the webhook.

What is stripe ?

Stripe is an online payment processor for small businesses and big enterprises. Stripe’s product offerings include processing payments for online and in-person transactions, subscription billing, sending payouts to third parties, and managing a business’s financial operations. It supports a wide range of payment methods, including credit cards, debit cards, and various alternative payment methods. Stripe is known for its ease of integration, comprehensive documentation, and developer-friendly APIs, making it popular among tech startups and online businesses looking to streamline their payment systems.

What is a webhook?

A webhook, in stripe, is a secure URL from your own website, that is called whenever an event (like a payment) happens with your stripe account. You can think of it as a notification center that always listens to when a payment succeeds in your website. Like someone buys a gig in your site, you will want your website to record this event, and show the shopped item in the user dashboard. Stripe uses the webhook system, to always call the set URL from your site when an event happens.

2. How does a webhook work ?

A website owner would set up a webhook in Stripe for several key reasons, all of which revolve around automating and enhancing the functionality of their online business operations. Webhooks in Stripe are essentially automated messages sent from Stripe to the website when specific events happen in a Stripe account. These messages are in JSON format and are sent to a specified endpoint on the website, allowing the site to listen for and react to these events in real time. Here are some of the main reasons for setting up a webhook:

  • Real-time Event Processing: Webhooks provide immediate information about events, such as successful payments, subscription changes, or charge disputes. This allows the website to update user accounts, access levels, or order statuses automatically without manual intervention.
  • Automating Workflows: They help in automating workflows like emailing customers payment receipts, renewing subscriptions, or triggering specific actions in response to payment failures. This automation enhances efficiency and reduces the need for manual oversight of each transaction.
  • Enhancing Security: Webhooks can be used to verify the integrity of transactions. For example, by listening for a successful payment event before granting access to a paid resource, you ensure that the resource is only available to users who have paid.
  • Custom Notifications: They enable customized notifications for various events, allowing the website to inform customers or team members about specific actions, such as refunds, chargebacks, or subscription updates, enhancing communication and transparency.
  • Data Synchronization: Webhooks ensure that the website’s database remains in sync with Stripe’s data. For instance, if a customer updates their payment method directly in the Stripe customer portal, a webhook can notify the website of this change, allowing the site to update its records accordingly.
  • Error Handling and Monitoring: By monitoring webhook events, a website can track errors or failed transactions and react accordingly, such as by alerting an administrator or automatically attempting to resolve issues.
  • Integrating with Other Services: Webhooks can be used to connect Stripe events with other tools and services used by the business, such as accounting software, customer relationship management (CRM) systems, or marketing platforms, creating a more integrated and automated ecosystem.

In summary, setting up a webhook in Stripe allows website owners to create more dynamic, responsive, and automated processes, enhancing the overall efficiency of their online operations and improving the user experience for their customers.

1. Why do I need a webhook

You need a webhook because your website needs to know when a payment is done, and more important, when is successful. That way the shopped item will show in the user dashboard in your website. Failure in not setting up correctly, or not setting up at all, the webhook, will lead to your site not recording any purchase, which will make your customers angry. Setting up the webhook is a very important step when setting up the stripe payment gateway.

2. How do i setup the webhook ?

First of all, you need to install the stripe payment gateway plugin/extension from our website. You will get this if you purchase the pro version of our micro jobs theme.
After installing the stripe gateway, you will see something like this in your website admin:
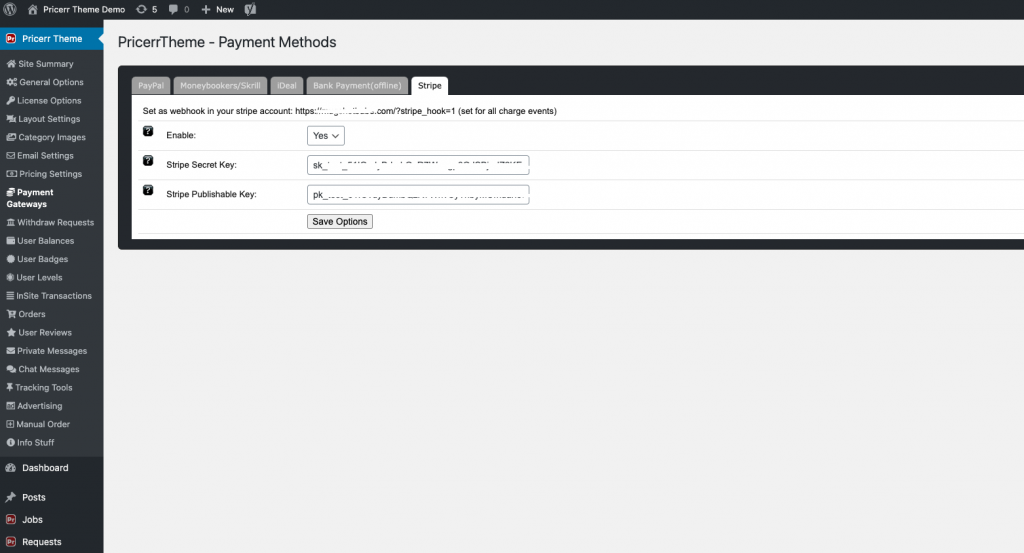
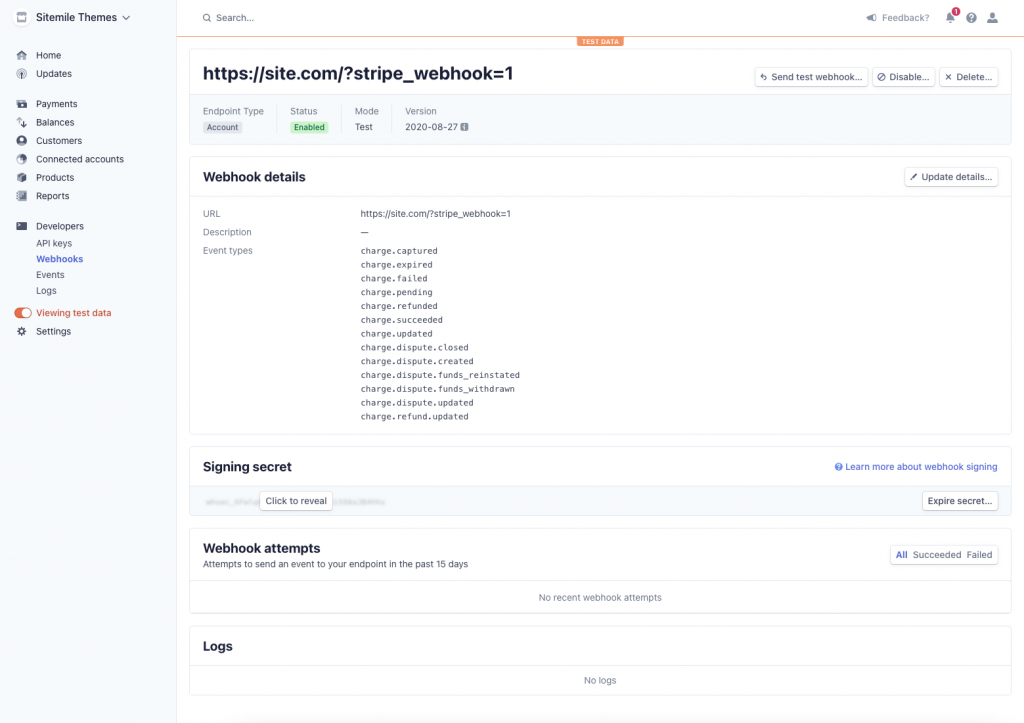
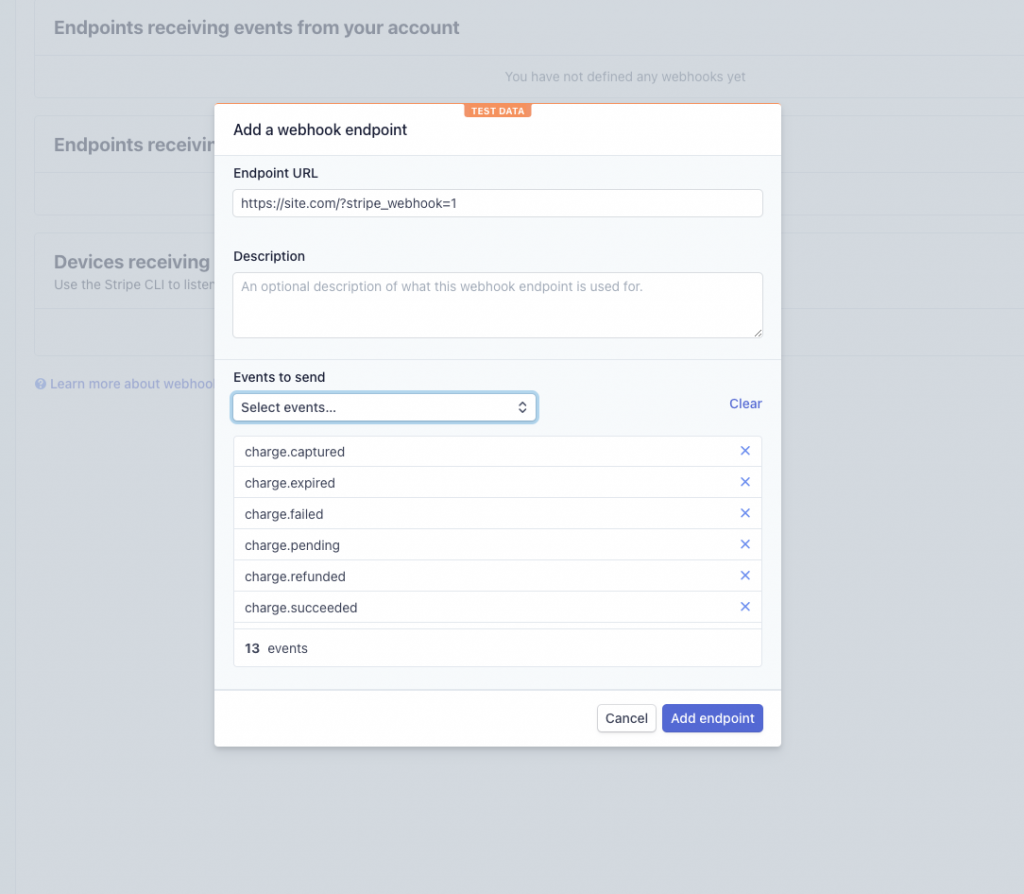
After that, copy the webhook url shown in that screen and add to your stripe account. Make sure you add for live account (or add for test account if you want to use that first).
If you have issues with setting up stripe in your WordPress microjobs theme, we do offer WordPress web development services for any WordPress type of site. So why not get in touch with us ? Because we have over 12 years of experience. Or if you need affordable web design services in general, we can also do anything other than WP.

This entry was posted in and tagged , . Bookmark the permalink.
Adding categories to your auction listings is very simple thing to do. All you have to do is going to backend wordpress, then Auctions menu, then Categories. You can see a visual of where this menu is placed in the screenshot below. Also the Locations can be added with the similar process. See Locations for this.

auction_cats

Bookmark the permalink.

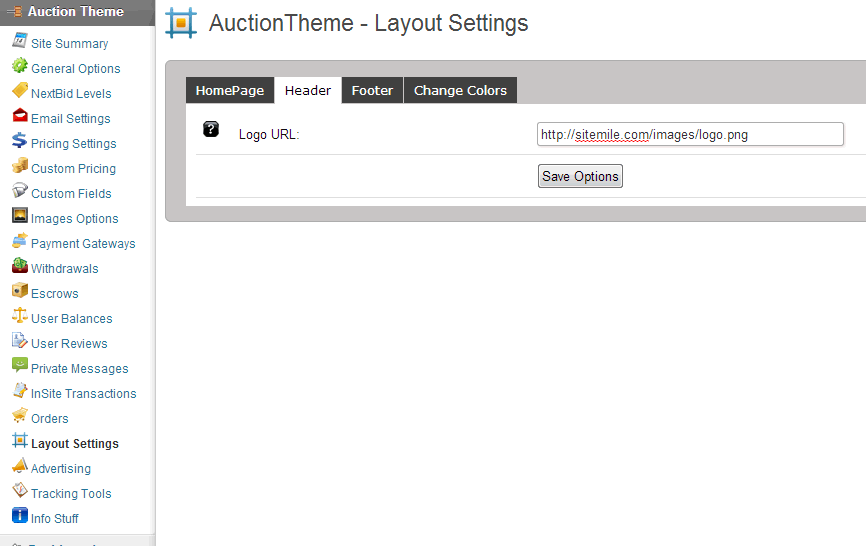
This page will briefly explain how you can add your own logo and replace the standard logo of the AuctionTheme. The process is simple and all you have to do is to follow the few steps explained below. First you have to get to the wp-admin area and to the AuctionTheme Menu, in the main left hand menu. Also the size of the logo can be anything you want, as long as the width is not bigger than 950 pixels.

logo_auction

  1. Go to wp-admin menu, in the backend area of your website.
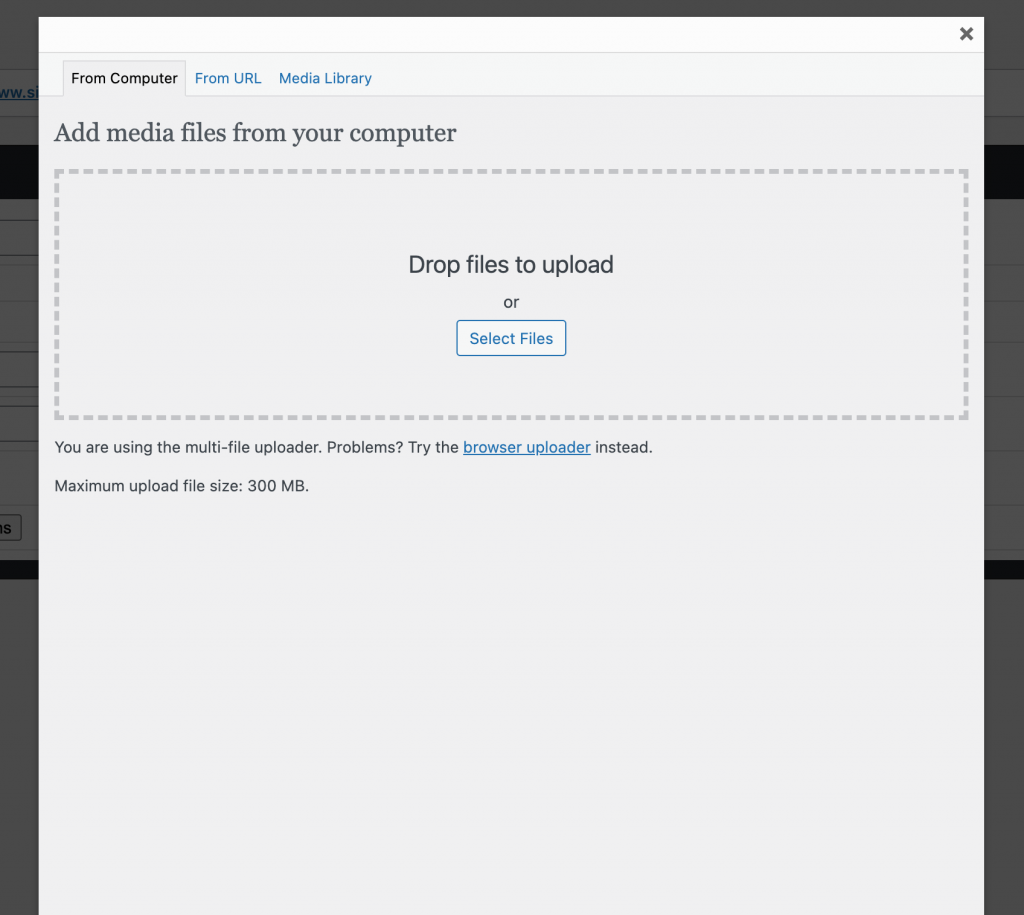
  2. Go to Media menu, and upload your logo, then copy the new uploaded file/logo.
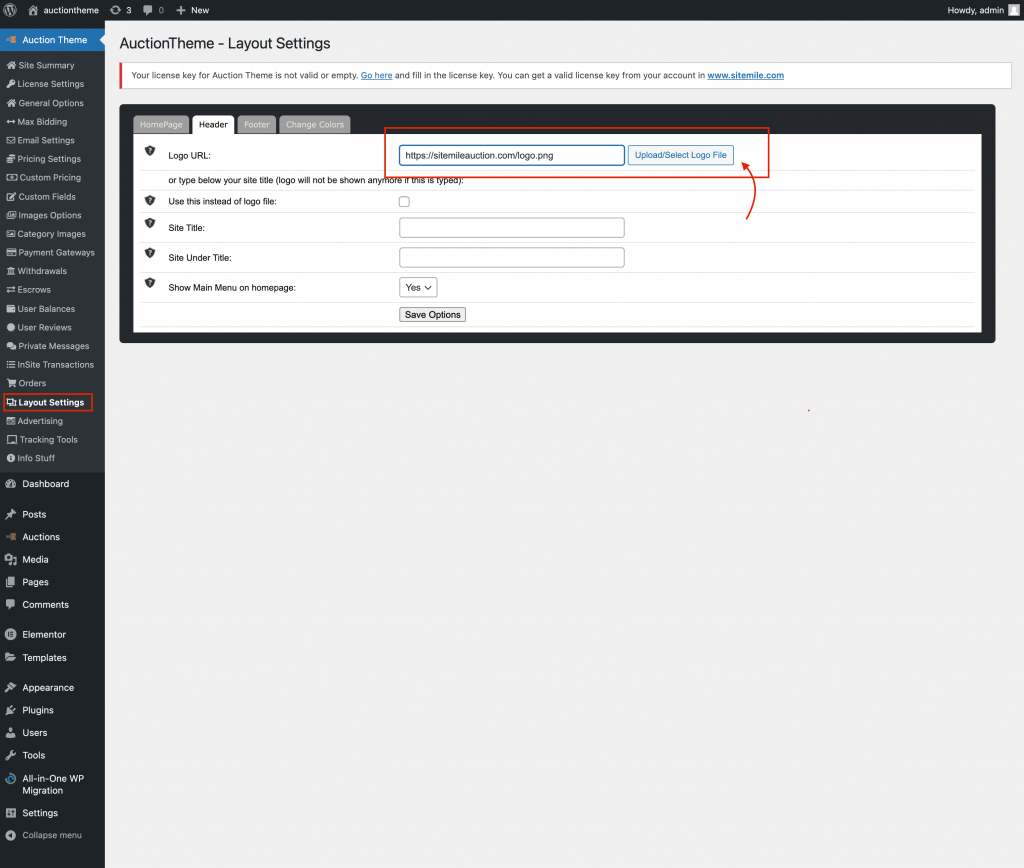
  3. Click on the AuctionTheme menu, then go to Layout Settings sub menu.
  4. Go to the Header tab and paste the image/logo url you just uploaded and save.
Bookmark the permalink.

This page will briefly explain how you can add your own logo and replace the standard logo of the Freelancer Marketplace Theme. The process is simple and all you have to do is to follow the few steps explained below. First you have to get to the wp-admin area and to the ProjectTheme Menu, in the main left hand menu. Also the size of the logo can be anything you want, as long as the width is not bigger than 950 pixels (width).

Layout Settings ‹ ProjectTheme — WordPress

  1. Go to wp-admin menu, in the backend area of your website.
  2. Go to Media menu, and upload your logo, then copy the new uploaded file/logo.
  3. Click on the ProjectTheme menu, then go to Layout Settings sub menu.
  4. Go to the Header tab and paste the image/logo url you just uploaded and save.
Bookmark the permalink.